Hide36
 
 
Computer
Anything Writes to a note.
OpenVPN  (Open Virtual Private Network) バーチャル・プライベート・ネットワーク                    《英三郎》


  ダウンロードとインストール  
 
ダウンロード  
 
インストール  

  サーバーの設定  
 
証明書とキーの作成準備  
 
vars.bat.sample の編集  
 
vars.batとopenssl.cnf の作成  
 
ca認証証明書の作成  
 
サーバー用の証明書  
 
DHパラメータの作成  
 
クライアント用証明書の作成  
 
複数のClient(接続先)の設定  
 
サーバー用コンフィグの編集  

  ▼ サーバーの起動接続  
 
ネットワークアダプターの設定  
 
OpenVPN GUI の起動と接続  
 
アダプターとルータの設定  
 
ファイアウォールの設定  
 
接続の確認方法  
 
 
  クライアントの構築  
 
クライアントコンフィグの作成  
 
MyTapとファイアウォールの設定  
 
OpenVPN GUI の起動とサーバーに接続  

 
コマンドプロンプトの使用方法  
 
ファイアウォールの設定  


 ■ OpenVPN Windows7 (x64) に構築 4 《クライアントの設定》

《設定前に》
   
ダウンロードとインストールがまだの方は
■ OpenVPN Windows7 (x64) に構築 1 《ダウンロードとインストール》』を参考にしてください
 
   
クライアントのみ使用の場合はサーバー接続用 クライアントコンフィグの作成だけです。


 ■ サーバー接続用 クライアントコンフィグの作成  
 
 
    ▼ 『client.ovpn』 コンフィグのカスタマイズ  
 
 
    クライアント用のコンフィグサンプルをコピーして使用します。  
   
『C:\Program Files\OpenVPN\sample-config』内の『client.ovpn』を
『C:\Program Files\OpenVPN\config』にコピーして編集します。
 
   
コピーした『C:\Program Files\OpenVPN\config\clientovpn』をエディタで開き編集します。  
      ※エディタが書き込み禁止(読み取り専用)の場合は『プロパティ』→『セキュリティ』から『書き込み』ができるようにしてください。  


      ※赤文字は入力。 適宜、自分用に変更してください。  
      ※青、緑文字は注釈です。 緑 《Enter》はEnterキーです。  
      ※参考のため原文はなるべく残しておきました。 文字コードはUTF-8  


##############################################
# Sample client-side OpenVPN 2.0 config file #
# for connecting to multi-client server. #
# #
# This configuration can be used by multiple #
# clients, however each client should have #
# its own cert and key files. #
# #
# On Windows, you might want to rename this #
# file so it has a .ovpn extension #
##############################################

# Specify that we are a client and that we
# will be pulling certain config file directives
# from the server.
client
# クライアント用

# Use the same setting as you are using on
# the server.
# On most systems, the VPN will not function
# unless you partially or fully disable
# the firewall for the TUN/TAP interface.
;dev tap
dev tun
# ルーティング方式では『dev tun』を使用します。

# Windows needs the TAP-Win32 adapter name
# from the Network Connections panel
# if you have more than one. On XP SP2,
# you may need to disable the firewall
# for the TAP adapter.
;dev-node MyTap

# Are we connecting to a TCP or
# UDP server? Use the same setting as
# on the server.
;proto tcp
proto udp
# UDP ポートを使用。

# The hostname/IP and port of the server.
# You can have multiple remote entries
# to load balance between the servers.
;remote my-server-1 1194
;remote my-server-2 1194
remote user1.abcd.co.jp 1194
# 『remote my-server-1 1194』の行頭に『;』を付加。
# 接続先サーバーのドメインまたはDDNSとUDPポート番号を指定します。

# Choose a random host from the remote
# list for load-balancing. Otherwise
# try hosts in the order specified.
;remote-random

# Keep trying indefinitely to resolve the
# host name of the OpenVPN server. Very useful
# on machines which are not permanently connected
# to the internet such as laptops.
resolv-retry infinite

# Most clients don't need to bind to
# a specific local port number.
nobind

# Downgrade privileges after initialization (non-Windows only)
;user nobody
;group nobody

# Try to preserve some state across restarts.
persist-key
persist-tun

# 切断したとき等の再接続に関する処理

# If you are connecting through an
# HTTP proxy to reach the actual OpenVPN
# server, put the proxy server/IP and
# port number here. See the man page
# if your proxy server requires
# authentication.
;http-proxy-retry # retry on connection failures
;http-proxy [proxy server] [proxy port #]

# Wireless networks often produce a lot
# of duplicate packets. Set this flag
# to silence duplicate packet warnings.
;mute-replay-warnings

# SSL/TLS parms.
# See the server config file for more
# description. It's best to use
# a separate .crt/.key file pair
# for each client. A single ca
# file can be used for all clients.
;ca ca.crt
;cert client.crt
;key client.key
# 『ca ca.crt』『cert client.crt』『key client.key』の行頭に『;』を付加。
# パスを変更しないときは『client.ovpn』と同一フォルダ内に各ファイルをコピーします。

ca "C:\\Program Files\\OpenVPN\\easy-rsa\\keys\\ca.crt"
cert "C:\\Program Files\\OpenVPN\\easy-rsa\\keys\\client01.crt"
key "C:\\Program Files\\OpenVPN\\easy-rsa\\keys\\client01.key"

# crt,keyの場所をフルパスで指定します。
# 『crient01』サーバーで作成したクライアント用のファイル名です。

# Verify server certificate by checking
# that the certicate has the nsCertType
# field set to "server". This is an
# important precaution to protect against
# a potential attack discussed here:
# http://openvpn.net/howto.html#mitm
#
# To use this feature, you will need to generate
# your server certificates with the nsCertType
# field set to "server". The build-key-server
# script in the easy-rsa folder will do this.
ns-cert-type server

# If a tls-auth key is used on the server
# then every client must also have the key.
;tls-auth ta.key 1

# Select a cryptographic cipher.
# If the cipher option is used on the server
# then you must also specify it here.
;cipher x

# Enable compression on the VPN link.
# Don't enable this unless it is also
# enabled in the server config file.
comp-lzo
# ファイルをlzoで圧縮

# Set log file verbosity.
verb 3
# ログレベル3の設定です。

# Silence repeating messages
;mute 20

 
      ※保存して閉じる。 (文字コード UTF-8)  


 ■ MyTapとファイアウォールの設定


      ■ OpenVPN Windows7 (x64) に構築 3 《サーバーの起動接続》』を参考にネットワークアダプタとファイアウォールを設定します。  
   
 
    《ネットワークアダプタの設定》  
   
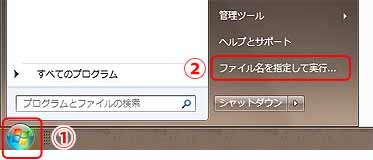
『スタート』→『ネットワーク』を右クリックして→『プロパティ』  
   
『ネットワークと共有センター』が開きます。  
   
左欄から『アダプターの設定の変更』をクリックして『ネットワーク接続』を開きます。  
   
『ローカル エリア接続2』を『server.ovpn』configファイルで設定した『MyTap』に名前の変更をします。  
      ※ローカルエリア接続の数字が違う場合があります。(TAP-Windows Adapter V9)  


《ファイアウォールの設定》  
   
『スタート』→『管理ツール』→『Windowsファイアウォール』→『詳細設定』からファイアウォールを設定します。  
   
『受信の規則』の一覧に無い場合は、操作欄の『新しい規則』→『○プログラム』→『OK』
このプログラムのパス:『参照』をクリックしてファイアウォールを通したいファイルを選択して『開く』→
『次へ』→『接続を許可する』→『次へ』
『○ドメイン』、『○プライベート』、『○パブリック』をチェックを入れ『次へ』
判別しやすい任意の名前を入力して『完了』をクリック。
受信の規則に登録です。
 
   
不必要な受信の規則は操作の欄から『規則の無効化』をクリックしてファイアウォールで遮断します。  
   
『ローカルコンピュータのセキュリティが強化されたWindowsファイアウォール』の
『Windowsファイアウォールのプロパティ』→『パブリックプロファイル』→保護されているネットワーク接続:『カスタマイズ』をクリックします。
ネットワーク接続『□MyTap』のチェックを外して『OK』。


  ■ OpenVPN GUI の起動とサーバーに接続  

 
    『OpenVPN GUI』 の起動。  
   
デスクトップの『OpenVPN』を右クリックして『管理者として実行』します。(XPは※を参考)  
   
タスクトレイに表示されます。  
      ※表示されていない場合は『隠れているインジケーターを表示する』クリックします。
※『C:\Program Files\OpenVPN\bin\openvpn-gui.exe』を右クリック→『プロパティ』→『互換性』→『特権レベル』→『管理者としてこのプログラムを実行する』にチェックを入れる。
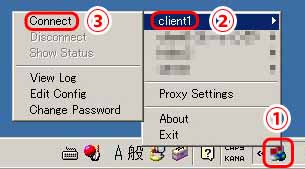
 
   
『OpenVPN』のアイコンを右クリックして『接続』を選択クリックして接続します。  


デスクトップの『OpenVPN』をWクリックで起動
または、右クリックして『管理者として実行』


赤色の『OpenVPN』アイコンを右クリックして『client1』→『Connect』

接続完了でアイコンが緑色に変わったら
『スタート』→『ファイル名を指定して実行』

仮想アドレス『\\10.8.0.1』を入力。
サーバーの共有フォルダが表示される。


      ※ログを確認してみてください。
※ サーバーもクライアントも正常に接続されていて、共有フォルダが表示されない場合はファイアウォールを確認してください。


      Hide36 Conputer Note  
      OpenVPN での Windows7 (x64) Virtual Private Networkの構築  
      OpenVPN Windows7 (x64) に構築 1 《ダウンロードとインストール》  
      OpenVPN Windows7 (x64) に構築 2 《サーバーの設定》  
      OpenVPN Windows7 (x64) に構築 3 《ネットワークアダプターの設定》  
      OpenVPN Windows7 (x64) に構築 4 《クライアントの設定》